SOCIAL MEDIA

Thursday, December 3, 2020

BABY'S FIRST CHRISTMAS GIFT GUIDE

 This time last year I was VERY pregnant and was kind of hoping that Evangeline would come early in time for Christmas. As you have probably already guessed, that did not happen. I am thankful she came in January after all because now her first Christmas is going to be so special. My favorite thing is watching little ones open presents. I can't help but film every second of it. The excitement they have and the look they get in their eyes just melts my heart. With Evie's birthday being less than a month apart from Christmas I struggled deciding on what to get her. I kept her presents fairly simple and tried to steer away from toys that her big sister already has. A lot of what is listed below you can find at small shops. Supporting small shops has always been some I'm very passionate about. Feel free to send me a message if you have any questions. Thanks for taking the time to visit my blog, I'm so glad you're here!


Click on the items below for the direct link. 


 8. BABY DOLL 


Sunday, November 29, 2020

Young Girls Gift Guide

I am still in shock that we are less than a month away from Christmas! Holiday shopping is a bit different this year with the pandemic so most of my shopping has been online this year. I love online shopping but I do really love to stroll down the isles and see the things I want to buy before purchasing. Let's hope next year is a bit different! For now though I did most of my Christmas shopping online. Below I've shared some gifts that we bought for Hadley this Christmas. She is four years old and very much so a "girly girl". Her favorite things are art, ballet, dolls and puzzles. She also loves to play outdoors but I save those kind of toys and things for her Easter basket since she can't really use them in the winter. I love supporting small shops so I've included some of those below as well. I hope you all enjoy the gift guide, I can't wait to give them to Hadley Christmas morning!


Click on the items below for the direct link. 

1. HOPSCOTCH MAT

2. CASTLE BLOCK SET   (the pink set is out of stock, but I linked something similar.)

3. BALLET BARRE

4. RATTAN MUSHROOM BASKET

5.MAILEG TRIPLETS 

6. CIRCUS PUZZLE  

7.BALLERINA DOLL

8.PLAY DOUGH SET

9. DOODLE IT BOOK

10. TREE PUZZLE

11. PIANO MAT 


Sunday, November 8, 2020

Christmas Home Decor

I can't believe its that time of year again but I am so ready for it! One of my favorite things to do is decorate our house for the holidays but Christmas has always been my favorite! I switch things up almost every year. I like to use things I've collected throughout the years and then add a few new items. I typically buy my Christmas decor from Anthropologie, Target and Pottery Barn. In the image below, I've shared some of my top picks this year that I've purchased and our new Christmas tree that I know several of you have requested I share :) Hope you all enjoy it, happy shopping!


Friday, September 11, 2020

Caramel Apple Crumble Pie


There's nothing better than the aroma of a hot apple pie baking in the oven on a crisp fall day. Make it a caramel apple pie and that aroma somehow got even better. I've said it before, I don't like apple desserts. So why do I keep on making them?... so that I'm not tempted to eat them and I just love the smell of them. After getting several message requests for the recipe I decided it would be easier to just share it here. Again, I did not make this recipe up... believe me I am not that talented lol. I did tweak it a bit and I will share all of that info below with the recipe. I loved seeing how many of you made the apple pie cookies and I can't wait to see if any of you make this pie. Be sure and tag me if you do, I love following along with others! 
 
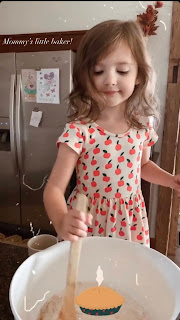
Here are a few behind the scenes pictures of Hadley and I baking the apple pie.
 

Ingredients

1 box of refrigerated pie crusts, softened as directed on box (I used 3 crusts total)
1 cup granulated sugar
1/4 cup all-purpose flour
1 teaspoon ground cinnamon (I always add a little extra cinnamon to everything)
5 cups thinly sliced peeled apples (I ended up using more like 4 apples, my pie pan wasn't very deep)
1/2 cup caramel apple dip (I used more like 3/4 cup- 1 cup of caramel)
2 tablespoons milk (add a splash or two more of milk if you add more caramel)
1 cup all-purpose flour
1/2 cup packed brown sugar
1/2 cup butter
 

Directions

  • Heat oven to 375°F. Make pie crusts as directed on box for Two-Crust Pie using 9-inch glass pie plate. In large bowl, mix granulated sugar, 1/4 cup flour and the cinnamon. Add apples; toss to coat. Spoon apple mixture into crust- lined plate. In small bowl, mix 2 tablespoons caramel apple dip and the milk; drizzle over apples. 
     
  •  In medium bowl, mix 1 cup flour and the brown sugar. With pastry blender, cut in butter until mixture looks like coarse crumbs. Sprinkle over filling. 
     
  • To make lattice top, cut second crust into 1/2-inch-wide strips with pastry cutter. Place half of the strips across filling in pie plate. Weave remaining strips with first strips to form lattice. Trim ends of strips even with edge of bottom crust. Fold trimmed edge of bottom crust over ends of strips, forming a high stand-up rim. Seal and flute. 
     
  • Bake 50 to 60 minutes or until golden brown. (My pie dish was very shallow so mine only needed to bake for about 40 minutes.)  Cool 10 minutes. Drizzle remaining caramel apple dip over pie. Cool at least 2 hours before serving.

Acorn Treats

 
Chocolate, peanut butter and butterscotch... oh my! This is one of the tastiest combos and its perfect for an early fall treat! The thing I love most about these cookies is that they are kid friendly. Hadley and I love to bake together and she got to help with every step! I wanted to use mini vanilla wafers but the only ones I could find were still too large to be the tops on the acorns (Hershey kisses). So we went with nutter butter bites instead. We melted some of the butterscotch chips for the glue. The cookie halves that still had some of the peanut butter icing on them didn't need any of our "glue" they held on their own. Then we use the same melted chips to stick the butterscotch chips to the top of the cookie to look like the stems. And there you have it, very simple and very cute! To see videos of how we put them together you can check them out on my blog posts IG highlight story or click the link here below. 


Saturday, August 22, 2020

Apple Pie Cookies

These apple pie cookies were a huge hit! I found the recipe on Pinterest and had to try it out. I am not an apple pie fan, its something to do with the texture of the apples I think. I originally wanted to make these as a treat to bring to Hadley's teacher during child orientation but we just found out the day before that school has now been postponed until September. At first I was pretty upset about the change, if I'm being honest I haven't done well with the constant changing that this pandemic has brought. I'm sure I am not alone on that! Now that I've had time to process the change, I think its a good thing. The next two weeks are going to be hot so we will just enjoy some more summer time together! Now, the reason I'm sure most of you are here for...the recipe! I will add my changes to it below in parentheses. These were super easy to make just a bit time consuming. Peeling and chopping up apples takes some time but again, super easy. I made the apple filling the night before and let it sit in the fridge in an air tight container. Then in the morning I just warmed it up in the microwave for a little bit. The smell of these baking in the morning was a great start to our day. I hope you all love them as much as we do!  

INGREDIENTS: 

1 double crust pie crust recipe (I USED PILLSBURY'S REFRIGERATED PIE CRUSTS. YOU WILL NEED 4 CRUSTS TOTAL TO USE ALL OF THE APPLE FILLING) 

4 cups apples, peeled, cored, and diced (I USED 4 LARGE GALA APPLES) 

3 tablespoons butter 

1/2 cup brown sugar 

1 teaspoon cinnamon (I USED A LITTLE EXTRA) 

1/4 teaspoon nutmeg 

1/4 teaspoon salt 

2 tablespoons all-purpose flour 

1 egg 

 INGREDIENTS FOR THE GLAZE: 

2 cups powdered sugar 

3 tablespoons milk (I ENDED UP ADDING A SPLASH MORE MILK, I FOUND IT TO BE TOO PASTE-LIKE, SO THE EXTRA MILK HELPED.) 

DIRECTIONS: 

1. Prepare pie crust and refrigerate for 1 hour. Pull from fridge and let rest on the counter for 10 minutes so they will roll out more easily. Line a baking sheet with parchment paper. Heat the oven to 425 degrees. 

2. While the oven heats, peel, core, and dice the apples. Melt the butter in a large skillet over medium-high heat. When butter is melted, add the apples, brown sugar, cinnamon, nutmeg and salt, and cook for 5-10 minutes over medium heat, stirring occasionally, until apples have softened and released their juices. 

3. Sprinkle the flour over the apples and stir thoroughly to combine. Cook for 1 minute more to thicken the juices released from the apples, then remove from heat. 

4. Roll out 1 crust on a lightly floured surface and cut it into apple shapes with an apple cookie cutter, or use a large circle cutter. Gently transfer the apple-shaped pieces of crust to a parchment lined backing sheet. You may need to combine and re-roll scraps of pastry dough. 

5. Scoop 1 tablespoon of apple pie filling into the center of each apple crust, leaving space on the edges to seal with a second crust. Roll out the second crust on a lightly floured surface and cut it into apple shapes with the same cookie cutter or large circle cutter. Carefully place each top crust on each mound of apple pie filling and press the sides down to match the sides of the bottom crust. You may need to slightly stretch the top crust to reach the edges. Use a fork to press around the edges of each hand pie for a good seal and a decorative finish. 

6. Make an egg wash by beating the egg in a small bowl with 1 teaspoon of water, then brush the tops of each hand pie with the egg wash using a pastry brush. Cut a slit in the dough on top of each hand pie. 

7. Bake at 425 degrees for 18-20 minutes, ( I BAKED THEM FOR 13-14 MINUTES, THE DOUGH WAS THIN) until the crust is lightly browned. While the hand pies are baking, prepare glaze by whisking together the powdered sugar and milk in a medium bowl. 

8. When pies are done, transfer them to a wire rack and brush with the glaze using a clean pastry brush. Alternatively, you could drizzle the glaze over the pies or even dip them into the glaze. (I USED A PASTRY BRUSH.) Allow to cool and let the glaze set for at least 10-15 minutes before serving either warm, cold or room temperature.

Friday, July 24, 2020

Almond Flour Banana Bread


I've been trying to use almond flour when I can recently. This is the first time I've tried this recipe out that I found online and I loved it! Super easy and yummy! To view the recipe just click on the link below. For the sweetener I used honey but I think next time I will use maple syrup. I also added chocolate chips to mine because Hadley loves it that way. Hope you all enjoy it as much as we did!

Almond Flour Banana Bread Recipe:

Monday, June 22, 2020

flower counting cards


Have a little one that loves flowers? Hadley sure does which is why I created this activity for her. She knows how to count really well but she struggles with number recognition so I thought this would be a fun way to practice that. These little flowers we used for the activity are actually gummy candies from Trader Joes. So naturally she ate a few while doing the activity which gave us another learning opportunity... subtraction practice! She loves math so this activity kept her busy for awhile. Below I attached the flower stem image that I created. All I did, as you can probably guess, is copied and pasted using Microsoft Word. I'll be posting a few more counting activities involving flowers later this week. As always, thanks for stopping by!


Thursday, April 2, 2020

EASY SPRINGTIME MEAL


I thought I would share an easy and tasty meal since a lot of us aren't able to eat out at restaurants anymore. This meal has been one of my favorites to make since Ross and I were first married. You can of course make it anytime of the year but I like to make it in the spring and summer best! I had to change a couple of ingredients this time because our grocery store was sold out of a few things. The thing I like most about this recipe is that you can change so many things up and its still so good. For example, in the spring I usually use asparagus but in the summer I use zucchini and yellow squash. I used to hate asparagus, couldn't even stand the smell. When I was a little girl my grandma would take me on walks down the road she lived on and we would pick wild asparagus that grew on the side of the road. She had to bribe me with brownies to get me to eat it! I didn't start liking it until I tried it grilled with olive oil and seasoning. Now I love it! This isn't a recipe I found online, I just threw things together that I thought sounded good together. By no means is this a professional recipe LOL, I just like simple ingredient meals. Let me know if you try it or have any questions! I hope you all enjoy it!


EASY SPRINGTIME PASTA

INGREDIENTS:
1 box of pasta ( I like to use farfalle or penne )
2 fresh chicken breast ( you can always use frozen but be sure to thaw it first)
2 TBS lemon juice
Italian seasoning
Fresh asparagus ( I buy it in a bundle and use about 3/4 of it )
Shredded mozzarella 
Olive oil
2 TBS butter

DIRECTIONS:
1. Start the grill ( ours takes awhile to warm up so we always do this step first ).
2. Butterfly chicken breast. 
3. Wash and cut up asparagus ( I like to cut the stalks in thirds and usually toss the bottom piece. If you have animals, they love to eat the asparagus bottoms. Our goats really enjoyed them tonight! )
4. Start boiling water for pasta.
5. Throw chicken on the grill and cook until fully cooked through.
6. I use a metal basket thats meant for grilling veggies in to cook the asparagus. Toss them in the basket and drizzle a little olive oil and lemon juice over them. Then sprinkle some italian seasoning. You can use other seasonings as well. I had to use Mrs. Dash seasoning because I was out of italian.
7. Place basket with asparagus on the top rack of your grill if you have one and cook until soft.
8. While the food is cooking on the grill, throw the pasta in the boiling water and follow directions on the pasta box. 
9. Once everything is cooked, you're going to start combining them. Make sure you cut up the cooked chicken into bite size pieces, it makes it easier to eat later. 
10. Drain the pasta and then put it in a large bowl or dish.
11. Add 2 TBS of butter and stir it in until melted.
12. Stir in the cooked asparagus and chicken.
13. Drizzle more olive oil and add a little more seasoning then stir until combined. 
14. Add some mozzarella cheese and stir that in until melted, ( sometimes I have to put the pasta in the microwave to melt the cheese. )
15. Enjoy!

***If you have extra time, throw the mixed pasta in the oven at 375 degree for about 20 minutes with some added cheese on top. I love it that way, I just usually don't take the time to do it!


Wednesday, March 25, 2020

Baby's First Easter Basket


Wow! I can't believe how fast the past two months have gone by. Evangeline will be just shy of three months old by Easter. I started collecting goodies for her Easter basket pretty early on, before she was even born actually. I'm so glad I did because who would have thought we would be in the situation we're in now! Thank goodness for Target drive-up and online shopping being available still. I have been able to purchase and receive everything I wanted to put in the girl's baskets this year even while being on lockdown. Putting together holiday baskets is one of my favorite things to do. I usually tend to go a liiitle bit overboard, but I just find this sort of thing to be so much fun. When it comes to Easter baskets, I like to fill them with a variety of things. It needs to have some fun items and some practical items as well. I usually try and find things that can be used in the warmer months. One of my favorite things to put in their Easter baskets is soap from Tubby Todd. I have done this since Hadley's first Easter. Bows are something I've always liked to add to her basket as well. Its been double the fun this year getting to put together two Easter baskets! Both of the girls are getting a super fun picnic basket from Anthropologie. As soon as I saw the baskets online, I could picture the girls skipping back to our creek, picnic baskets in hand full of snacks to share. There are several items that are not pictured in my post on IG that will be in Evie's basket. I will list them below and will also be adding a few things I didn't buy but thought may be a fun idea. When I get some more time I will be making a post for Hadley's Easter basket as well. While these baskets are fun, I do pray that our main focus of Easter be on Christ and the ultimate sacrifice He made. I hope you find this post to be fun in time when it seems a little uncertain of how we'll even be spending Easter this year. Just remember as long as we keep our eyes and hearts on the Lord, it will be a blessed Easter no matter where or how its spent. 

Thursday, January 9, 2020

DIY VALENTINES WREATH


Can you believe Valentine's Day is in just over a month?! Time seems to be flying by which is great because I'm so ready to meet our baby girl in a few days! I don't normally decorate much for Valentine's Day but this year Target had so many cute decorations that I decided it would be fun! It also has helped me transition out of Christmas decor without going straight into spring decor. I decided to keep out a lot of pink and white bottle brush trees and the little white houses from Target that compliment all the valentines decor. 
My inspiration for this wreath is actually from Target's valentines decor. Below is the picture of Target's wreath, its by their Spritz brand. The link will be attached below in case you want to purchase it or take a closer look at it. I wanted to make my own so that I could use the colors I like and have it be a touch bigger. On my Instagram stories I showed pictures of the steps it took to make and attach the tassels. I didn't go into depth on how they were made because I am going to do that here. I will try to be as detailed as possible but if you have any questions please send them my way!